About The Steam Era Freightcars Blog

This blog discusses all aspects of North American freight cars of the steam era, from the dawn of railroading through 1960.
It is intended to support the efforts of model railroaders who wish to produce the most prototypically accurate freight cars possible.
Prototype modelers are encouraged to participate in this blog. Please consider sending photos of prototypes and your efforts to model them, reviews of kits, books and other products, “articles” about your modeling efforts – with or without photos. The nature of blogging means the material can be "real time," and in-process models can be shared. These are not only welcomed, but appreciated as we all love to see a model develop over time.
Also welcome is information about upcoming prototype meets, shows, and other events.
Information submitted for this blog is considered gratis. Also, all submissions must include your name and contact email.
For more information or to submit information email steamfreightcar@gmail.com.

Wednesday, December 3, 2014

From Athearn Bluebox to Marble Flat....

Completed flatcars in service on New England, Berkshire & Western.
Photo courtesy Rensselaer Model RR Society 
By Bill Gill
Photos by the author unless noted

Hi Marty, 
Don't know if this would qualify as prototype modeling or not. I recently detailed a pair of Athearn 40 ft flatcars for the NEB&W to approximate Rutland cars set up for marble service. I detailed and numbered the models for 2792 and 2755 shown in Shaughnessy's photo below, but they are, as is club practice, lettered for the NEB&W.  Bill Gill
Jim Shaughnessy photo courtesy Rensselaer Model Railroad Society (NEB&W)


Jim Shaughnessy photo Courtesy Rensselaer Model Railroad Society
 Compare the prototype side rivet pattern to the close up of the model below. 


Brake staff detail is scratchbuilt. Similar to prototype (below). (Note: rivets and uncoupling lever not yet added to end and original stirrups not yet replaced)


Thursday, November 13, 2014

Resin Car Works Type 27 7K and 8K Acid Tank Car Kits - Update

Seems like this fall has lots of big news about little tank cars...
I received my Resin Car Works Type 27 7,000 and 8,000-gallon Acid tank car in yesterday's mail, and look forward to building it this weekend. I'll be sure to post some photos of the build on this blog.
In the meantime, RCW is gearing up to ship kits. Kits will be available direct from the manufacturer's web site (resincarworks.com) in early December - shipping date is dependent on when the photo etched parts arrive. RCW will accept PayPal or payment by check with a printable order form.

Here's the flyer showing the roadnames that will be offered in the first run of kits:
 

Friday, November 7, 2014

New HO Scale 8K Chemical Tank Car from Tangent

I mentioned at Naperville there were rumblings about a couple of new steam era freight cars that "maybe" would be announced around the time of Trainfest in Milwaukee.
Awoke to find this posted this morning - Marty

"Tangent Scale Models is proud to introduce our next ALL-NEW freight car replica, the General American 8,000 Gallon Acid Tank Car with Welded Underframe.  Following World War II, specialized liquid shippers requested new special duty tank cars, and General American Transportation Corporation met their demands by producing specific-service cars such as this 8,000 gallon acid service tank car.  At the same time, General American switched from a riveted underframe and riveted tank design to a welded underframe and tank.  While General American’s factory in Sharon PA manufactured at least three different post-war versions of 8,000 gallon acid all-welded tank cars, these specific prototypes were produced between 1949 and 1960.  Like all Tangent Scale Models offerings, these tank cars had long service lives, lasting well into the 1980s in revenue service.  Acid service tank cars were commonly-seen nationwide, providing transportation for strong chemical compounds, such as hydrochloric (muriatic), hydrofluoric, phosphoric, and sulfuric acids.  Acid tank cars were rubber-lined, featured one percent expansion domes on the top, and did not have bottom tank outlets. 

The Tangent Scale Models General American 8,000 gallon acid tank car is a visually-distinctive model that includes details accurate for each paint scheme.  Note the distinctive small expansion dome at the top, surrounded by a beautifully-rendered “see-through” safety walkway.  Our walkways along the side of the car are also “see-through” safety tread, just like their prototypes.  As always, our correct “true-to-life” colors and “hyper-accurate” lettering includes exact fonts and lettering placement.  Finally, our scale replicas operate as well as they look, equipped with free-rolling all-metal wheels and Kadee® scale couplers, meaning our models are truly ready to run.  
This is NOT a pre-order announcement.  Our NEW Ready to Run replicas are available NOW at www.tangentscalemodels.com and we are selling these at Trainfest in Milwaukee on November 8-9.  Whether wearing “plain” GATX lease colors or the colors of a lessee, these replicas will certainly be eye-catchers on your layout!  Our first stunning release includes four paint schemes:
GATX “Black Lease 1952+” in the plain “black lease 1952+” scheme.  This GATX black lease scheme represents a general lease car in service beginning in 1952 and is broadly applicable across North America.  It is available in four road numbers.
 GATX “Stauffer Chemical Company” in the distinctive gray and black scheme with a 1953 paint date and 1949 build date, complete with the Stauffer diamond logo and Victor Chemical Division lettering, just like the prototype car.  These stunning cars are available in four road numbers.
GATX “The D O W Chemical Company” in the black scheme with striking yellow graphics including “Freeport Texas” lettering.  These nationwide service cars include a 1953 paint date on the side of the car.  This GATX lease scheme is available in four road numbers.
GATX "White Lease 1971+” in the striking “white lease 1971+” scheme which includes a large black stripe in the middle of the car.  These cars were repainted in 1971, which of course is modeled after an exact prototype photo.  These cars lasted in service into the 1990s, and are available in four road numbers.
Undecorated RTR Black 1949-1951 cars are immediately ready for decaling!
Undecorated RTR Black 1951-1960 cars are immediately ready for decaling!
Undecorated Unpainted Kits are available as well for those who desire to build their own. 

Pricing for RTR models is $44.95.  High-resolution images showing these fine replicas are available at www.tangentscalemodels.com  and our site also includes prototype images for your reference as well."

Friday, October 24, 2014

One Man's Roster*

Trevor Marshall has posted a series of four posts to his excellent Port Rowan blog showing some select members of his roster, including more than a couple of examples built by co-moderator Pierre Oliver through Pierre’s Elgin Car Shops** custom building service:

I plan to do something like this with my Central Vermont roster, and encourage others to do the same for their favorite road or subject. What I'm thinking of is a variation of the "One Man's Roster" from vintage issues of MR, especially if it was divided by road or era (ie., "Bill models the Santa Fe in 1948, here's some of his home road cars....")
If you’re interested in sharing your roster on this blog simply email photos and a description of your prototypical steam era cars at me at STEAMFREIGHTCARatGMAILdotCOM . (Obviously replace the italized portions of that email address with the standard symbology.)
*Or do we need to be politically correct here and make it "One Person's Roster?" Don't want to discount any female modelers out there.
**To paraphrase one of those old late night Television ads, “I’m not only a Elgin Car Shops fan, I’m also a client ….”

Thursday, October 23, 2014

New parts from Yarmouth Model Works

New etched parts are available now from Yarmouth Model Works.
6 new stirrups and 2 new running boards

These are 2 examples, visit Yarmouth Model Works for full details.

Tuesday, October 21, 2014

The rumour is true

Yarmouth Model Works is developing 40' boxcar kits in HO scale featuring the AC&F proprietary end and roof.
You can see photos of the parts here, http://elgincarshops.blogspot.ca/

Naperville (Lisle) 2014 RPM Report

By Marty McGuirk
I had the last minute opportunity to attend the “Naperville” (actually, it’s in Lisle, Ill., but old habits die hard….) RPM meeting last week.  It was great to catch up with some old friends and make some new ones.  I’ve always enjoyed this meeting since I went to the very first one organized by Martin Lofton.  Joe D’Alia took up the banner when Martin passed away a few years ago and has done a great job keeping this “RPM National” meet going.
I was in the hotel for no more than five minutes when someone asked about including another of Bill Welch’s excellent clinics on this blog.  Apparently Bill mentioned during his presentation that he would ask me to post the clinic here. The answer is I’ll be happy to – once Bill sends me the file!
The following report was developed from what I observed and heard about, with some details I gleaned from others on the STMFC Yahoo Group.  Please feel free to comment with any corrections, additions, or changes.  I didn’t take many photos so if anyone has pictures of the items mentioned below please let me know and I’ll incorporate them into this post.
There were no new steam era freight car models announced at the meeting, but we did have some status updates on projects we already know about and one or two interesting items.
Andrew Dahm (Westerfield) was present and he was showing some new items he is working on, including double deck Rock Island stockcars.  As a New England modeler that’s not terribly interesting to me … but it's a neat car. I was very interested in a new casting for supporting house car roofs that will soon be a part of his kits.  This will be available separately - currently shown HERE on the Westerfield web site for 1500/4200/4300 series kits. 


Yarmouth Model Works "wavy side" Wabash welded boxcar.
Yarmouth Model Works (owned by Pierre Oliver, one of the co-moderators of this blog) was there with his new HO scale Wabash boxcar with the wavy welded sides. I picked up a few of Pierre’s newer etched metal items, specifically end braces for running boards and replacement stirrups for Intermountain boxcars and reefers. Yarmouth Model Works has been developing HO scale versions of the AC&F proprietary end and roof. Sample prints have been on hand for a while now and Pierre’s been showing them to a select few.  He did mention that in a year or so it his intention to release a number of 40' boxcar kits featuring the AC&F end, roof and "Carbuilder" end.  That's all he’s prepared to say at this time.


In the Display Room Saturday morning I had a chance to see the Resin Car Works, (a new enterprise from long-time Sunshine pattern maker Frank Hodina) AC&F HO scale Acid Tank cars.  Along with the tank car was something of a surprise – an Illinois Terminal class B electric locomotive.  Sideframes and the Loco superstructure are resin with NWSL drives in each truck. Frank also shared some details on his next HO freight car. More on that at a future date.
Finally, at various points during the weekend I heard rumblings of new models in the works. I was told Kadee has a new HO freight car well along in the tooling process. It will be available about the end of the year or early 2015. I also heard at least one, possibly two other new transition era cars that will be announced “….sometime in the next few weeks.” And indications are both will be available on announcement.  We’ll see.
For those planning ahead it was announced that Lisle RPM Meet will be third weekend in October at the same location. Check this WEBSITE for more details.

Friday, September 26, 2014

Deck techniques on a flat car build

By: Eric Hansmann
Photos by the author


A recent HO scale kit build of a pair of Pennsylvania Railroad F22 class heavy duty flat cars made me rethink the deck castings and presentation. I had planned to cram lead shot and strips into the nooks and crannies of the underframe, as had been done on a few older resin freight car kits with deep side sills. I did not like that process so my mind wandered. How can weight be added using a simplified effort?
Several years ago, I applied a sheet lead weight to a USRA composite gondola model and covered the lead using a paper print out. The original gondola bottom part was scanned and the printed and trimmed image was laminated to the lead sheet in place of the floor. The combination gave the model a great operating weight and minimized the floor thickness. I decided to try this on the F22 flat cars.


These are nice Funaro & Camerlengo models, but they are pretty light. With trucks and couplers, the basic frame weighs 0.5 ounces without the resin deck casting. A lead sheet trimmed to the deck dimensions weighs 1.3 ounces. Sadly, I only have a cheap, hardly calibrated postal scale. Scientists would laugh at this so these are rough figures. The NMRA recommended weight for this thirty scale foot model is 3.0 ounces. I aim for 75% of the NMRA recommendation. The combined lead sheet and model falls about 0.5 ounces below my 2.25 ounce target. A load may boost the weight in the long term, or some extra can be fit into the underframe cavities. But the lead sheet can minimize the work.
Encouraged by the overall weight addition, I moved forward and prepared a deck casting. A rattle can of light tan color was sprayed onto the deck. A wash of oil-based burnt umber came next then dirt and soot were applied using Pan Pastels and Bragdon powders. The deck was scanned. The lead sheet is 0.047 inches thick, about four HO scale inches. A laminated image will need to wrap around the sides and ends. Using Photoshop, portions of the deck image were copied and pasted to create an image that will overlap the thickness of the lead sheet. This was printed onto glossy photo paper, trimmed, and carefully laminated to the lead using rubber cement. 
I shared a progress image with a circle of modeling friends and requested critical responses. Overall, they liked the basic idea but there were a few issues.
The edges were not crisp
It looked thick
The corners needed more attention
The deck color looked too new
I agreed with all of their points so work began anew, which was easy since I was building two of the same kit. The second deck was sprayed with primer grey. An oil-based black wash was applied then Pan Pastels and Bragdon powders were used to add grit. Here are the process images for those three stages of work.

Step 1: Deck Wash
Step 2: Deck Dirt
Step 3: Deck Soot

The second deck was scanned and manipulated similar to the first attempt. Grey lines were added to mark the boundary of the deck edge and to emphasize that edge. This also helps when folding the image over the lead sheet. 

As there were two decks they should not be identical. The first deck scan was used so portions of that deck could be copied and pasted onto a copy of the second deck image. These lighter toned portions of the first deck made it seem like replacement boards had been added. A heavily weathered portion of the second deck image was replaced with a copy of another part of the same deck and rotated. After some nudging of digital image parts, the two decks were ready to print.

Plain paper was used for the printout and this was much thinner than the glossy photo stock. Each image was carefully trimmed and laminated to the sheet lead weights. Care must be taken to avoid overlapping the paper on the back of the lead. This minimizes the thickness and makes a smooth surface for the final installation.

Once the print out is laminated to the lead sheet, it needs to be sealed with clear flat. This needs to be done to minimize liquid damage to the print out. The decks are done but they await installation on the car body until after the painting, lettering, and weathering phases are complete. At that point, the hand brake hardware can be installed as well as any hardware for load transportation. 
By using a printed laminate, a modeler could make a few different decks for the same flat car body. Portions of different deck images can be substituted onto other deck images to vary the appearance through different print outs. A pair of brass pins mounted in the lead sheet could be keyed to position the deck, enabling an easy change of loads that are secured directly to the deck. I haven't gone this far yet, but it has crossed my mind. 


Monday, August 25, 2014

Presentation: North From Florida: Moving Perishables to Market on the FGE/WFE/BRE System by Bill Welch

Link to a .pdf version of Bill Welch's FGE/WFE/BRE clinic:

https://drive.google.com/file/d/0B94IMVImVzmmN2MzWnpSYmdWdms/edit?usp=sharing
 Bill Welch was kind enough to send along one of his clinics to share with readers of this blog. Bill is writing a much-anticipated book on the history of the FGE/WFE/BRE system - this presentation in photos and captions will give you a taste of the fascinating history of this group of companies.
This presentation is copyrighted, and should not be copied or redistributed without the express written consent of the author. 
Bill didn't want to break this up into several posts, so I originally posted all 70+ jpegs into a single blog post. That was certainly not an optimal solution.
Thanks to some input and suggestions from a couple of blog readers, most notably Richard Brennan, I decided to upload such large documents off the blog and will share them via Google Drive - accessible at the link above or by clicking 
HERE 
Please let me know what you think about sharing this type of presentation on the blog. And thanks to Bill for sharing it and to Richard for his suggestion on a more efficient way to share this outstanding clinic. - 
Marty McGuirk, Steam Freight Cars Blog owner. 

Thursday, August 21, 2014

Event: Atlanta RPM Meet, September 19-20, 2014

Fenton Wells sent along the following announcement:

Mark your calendars for September 19 – 20, 2014, get your models ready to display and plan to bring a friend. SRHA Archives work session will begin on Tuesday, open house at the Canton, St. Paul & Pacific live steam layout will be Thursday afternoon.
The Southern Railway Historical Association is pleased to announce the first Atlanta Railroad Prototype Modelers (RPM) Meet. A joint effort of SRHA, Atlantic Coast Line & Seaboard Air Line Railroads Historical Society, Central of Georgia Railway Historical Society, Nashville Chattanooga & St. Louis Preservation Society, Tennessee, Alabama & Georgia Historical Society, The National Model Railroad Association and the Railway & Locomotive Historical Society.
Focus is on sharing and learning what modelers are doing and how they're doing it. The meet welcomes models in any scale, finished or under-construction, based on prototype locomotives, rolling stock, structures, and scenes, regardless of the modeler's skill level. Nearly forty clinics, model, and dealer areas will be open to attendees. Modular model railroad layouts will be up and running during the meet.
The Southern Museum is the home of the Western & Atlantic No. 3, The Civil War “General”; The SRHA, The David Salter, Glover Machine Works, Col. Jim Bogle and Marvin Black drawing, photo, and document collections along with other Civil War and railroad collections. Admission to the  museum, adjacent to the CSX Chattanooga Subdivision mainline, is included in the RPM registration.
Advance registration is $45, on site $50. C,StP&P open house: (only with RPM registration) $10.00. Information, On-line Registration and Clinic Schedule on the SRHA web site at: www.srha.net/RPM.
 
Sponsoring organizations’ dealer tables ($0), commercial dealers ($25), contact
Paul Faulk @ aclsalhshelp1@...


Wednesday, August 20, 2014

Central Vermont 40,000-series Howe Truss Boxcars


By Marty McGuirk

The Strasburg Railroad in Lancaster, PA, is home to a number of nicely restored steam era freight cars, including a Central Vermont 40,000-series car (the Pennsylvania State Railroad Museum directly across the street also has an impressive collection and is well worth a visit).
When I was up there in mid-November of 2012 the car wasn’t in the best place for photography, but I managed to get a couple of pictures in the late-afternoon light that show off the details of the car.
 History
The Central Vermont received 200 of these single-sheathed 40-foot boxcars from American Car & Foundry in late 1924. These cars, numbered 40000-40199, represent some of the earliest examples of what are commonly referred to as “alternate” standard ARA boxcars. Although never proposed as a standard by the ARA’s Committee on Car Construction, more cars were constructed to this Howe truss design with two diagonals on either side of the door, than were built to the ARA standard single sheath design. 
The underframe was wood, with six stringers in place of the typical single pair of steel, Z-section stringers.

Closeup of the end of the restored car shows the ladders,
the top end plate, and the Carmer uncoupling lever.
 
 The CV’s cars were delivered with wood six-foot doors, Andrews trucks, and Hutchins roofs. They had an inside height of 8 feet, 6 inches. As built, they were equipped with vertical brake staffs, but all would eventually be retrofitted with geared handbrakes and Ajax brakewheels. they also came equipped with Carmer uncoupling levers. The sides had seven grab irons, while the ends were equipped with six rung ladders with the stiles mounted far enough from the end to clear the diagonal brace on the end. 
AC&F Builder's Photo shows the vertical brake
and end components. 
The ends of these cars were perhaps their most unusual feature. They were composite ends (wood with two vertical and two diagonal braces). Spanning these braces across the top was a pressed steel component referred to as a top end plate. The Car Builder’s Cyclopedia, defines an End Plate as:

 “A member across the end and connecting the tops of the end posts of a car body and fastened at the ends to the two side plates. It is usually made of the proper form to serve as an end carline.”*

Other single sheathed cars with composite ends used end plates of course, but what seems to make the ones of the CV’s 40000-series cars somewhat unusual is the fact that it was a pressed steel component, not fabricated from standard structural steel components.
The cars remained in service, pretty much as built, through the late 1950s and early 1960s when many of them were retired or placed in some form of company service.
 Approximately 25 of these cars were modified with the addition of grain hatches to the roof and hopper bottoms for grain service.


 Painting and Lettering
As delivered the cars featured the CV’s then-standard Roman lettering, with “Central Vermont” spelled out across all three “panels” to the left of the doors, and no "CV" initials, with the car numbers centered underneath.
During the Second World War (January 1942), the CV changed to the stacked Gothic lettering, with the road name spelled out in two lines, with the addition of "CV" reporting marks above the car number, like that shown on the restored car at Strasburg, and on this car: 
Initially, there was a white line above the “CV and below the car numbers. In later repaintings through the 1950s these lines tended to be removed, like in this view of 40050:
 The final paint scheme on these cars was in the early 1960s with the addition of the intertwined CV logo on the door.

Models
A “layout quality” representation of these cars can be made using the old Train Miniature single-sheathed (incorrectly called by modelers “outside braced”) cars. John Nehrich described such a conversion in an old issue of Mainline Modeler, later reprinted in a book by Hundman Publications. Both are long out of print, but you can find old issues of Mainline Modeler at swap meets or on eBay.
About 15-20 years ago Steam Shack produced a series of resin freight car models for a number of CV boxcars, including the 40000-series cars. These models were made for Steam Shack by Funaro & Camerlengo, who still offers these as their Kit 7060 (as built cars) or Kit 7061 (cars equipped with roof hatches and hopper bottoms).
There are some issues with the F&C kit - the sides are rendered as heavily weathered - which some feel is a little on the heavy side (I tend to agree), making the model look like the prototype did late in life and not as these cars would have looked in service. There's also some issues with the ends - primarily the height of the end sill - on the resin cars it's much taller than on the prototype. But the Steam Shack/F&C kits do represent a good starting place for an accurate model. 

*Thanks to Dennis Storzek for his help in determining the most accurate description for the components of these cars. 

Tuesday, August 19, 2014

Tips and Tricks: Removing Small parts from Resin sheet


By Marty McGuirk

One technique you might find useful on a resin kit is the following method to remove all those tiny resin details from the resin "flash" sheet. Instead of spending hours with a hobby knife and needle files anxiously separating the part from the resin try sanding that flash away.
In this case I started removing the stake pockets (26 of them) by cutting about 3 or 4 of them from the main sheet. Then I gently rubbed the piece on a sanding stick (which I happened to have handy, for larger parts - like a stock car side - use a piece of sandpaper on a flat surface). Moving the part in a gentle circular motion will make the resin paper thin. Eventually you'll find the pieces will pop right out!

Monday, August 18, 2014

Tips and Tricks: Weighting a flat car


By Marty McGuirk

I build most of my freight cars to run on the layout, not to enter a contest. This means I often don't bother adding the those parts and underbody components that (1) interfere with operation or (2) can't be seen in profile with the car sitting on the track. I might ignore Rule 2, but I never break, or bend Rule 1.
Adding weight to house cars is pretty straightforward but adding enough weight to a flat car or gondola can be a challenge. You could weight a flat car by adding a heavy load, but it’s nice to have an empty car that tracks reliably.
I used A-Line "lead buckshot" style weights for this. The photo shows about half the weights in place. I tried CA at first, but that was difficult to work with. I found a thick coat of Pacer Formula 560 Canopy Glue is a great way of adhering dissimilar parts (like etched metal to plastic) so I decided to try it. My tests showed the buckshot stayed in place so I filled the "voids" between the center sill and cross stringers above the trucks with Canopy Glue and dropped the buckshot into the glue. I also filled the space between the two center sills with Canopy Glue and dropped in more lead shot. 

Sunday, August 17, 2014

Updating the Rutland PS-1 Boxcar


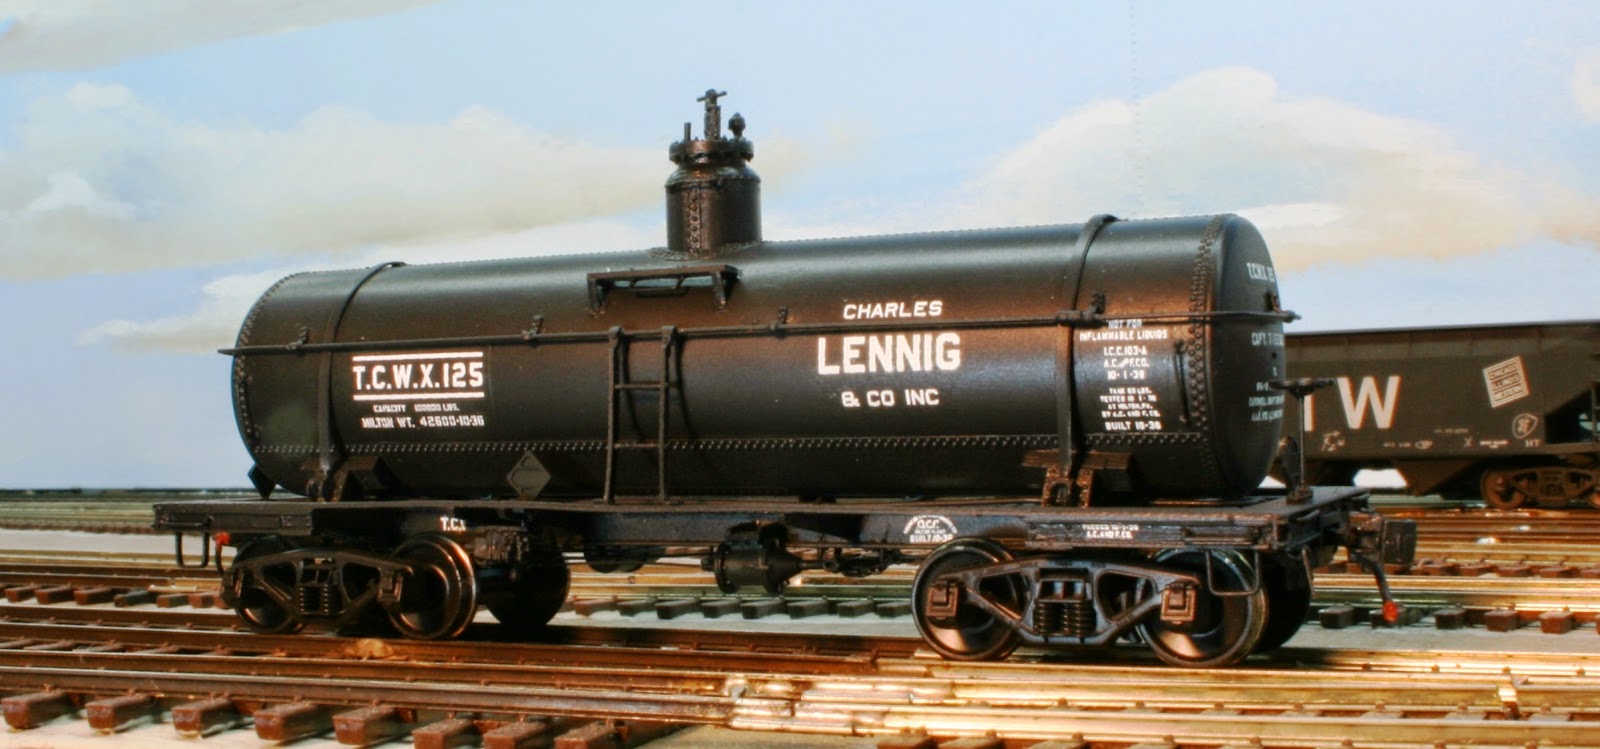
A comparison of Rutland PS-1 #100, as built and #194, with all updates completed.
Reprinted with permission of the Rutland Railroad Historical Society and authors Phillip Blancher & Kevin Pytlak. Article published in Winter 2014 (Volume 25, Number 4) issue of the Rutland Railroad Historical Society magazine, "The Newsliner."

By Phillip Blancher & Kevin Pytlak
All Photos by Phillip Blancher

Pullman Standard's PS-1 box Car is THE iconic piece of rolling stock that defined the vision Rutland Railway president Gardiner Caverly laid out for the railroad in the early 1950's, that of a modern, streamlined, service-oriented gateway that would rapidly move shippers products to market. If you are a model railroader modelling the Rutland in the 1950's or early 1960's, a fleet of these cars is a must. 
In the last 15 years, HO-scale modellers have been fortunate to have had two manufacturers release PS-1’s, and in 28 car numbers. Kadee's well-detailed model is presently available in four road numbers while Intermountain Railway Company has produced 24 different numbers under their own brand as well as for The Express Station and The Steam Shack. The Intermountain models have been updated along the way, meaning that there is some variation in the amount of detail on production runs. The Steam Shack's later releases included etched roof walks and improved paint and graphics. Updating the detail fidelity of the earlier Intermountain releases is not a difficult operation and can be done in stages. 
The first task for us was to consult any and all photos that could be found among the many sources available: books, issues of The Newsliner, and the Internet. Required information that could not be easily tracked down ended up as questions placed on the Steam Freight Car email list hosted on YahooGroups. Once sufficient information was gathered, a shopping list of items required to update the various PS-1 models was drawn up.
As an-built photo of the original kit, purchased used from a seller on Ebay.
Many of the earlier cars were purchased on the E-Bay auction website or on the YahooGroups HO Interchange email list. Some of the cars were purchased as un-assembled kits, but others were ready-to-run. This article will deal only with updates and changes to the fidelity of the car, and will not cover any repairs that had to be made to a previous owner's work.
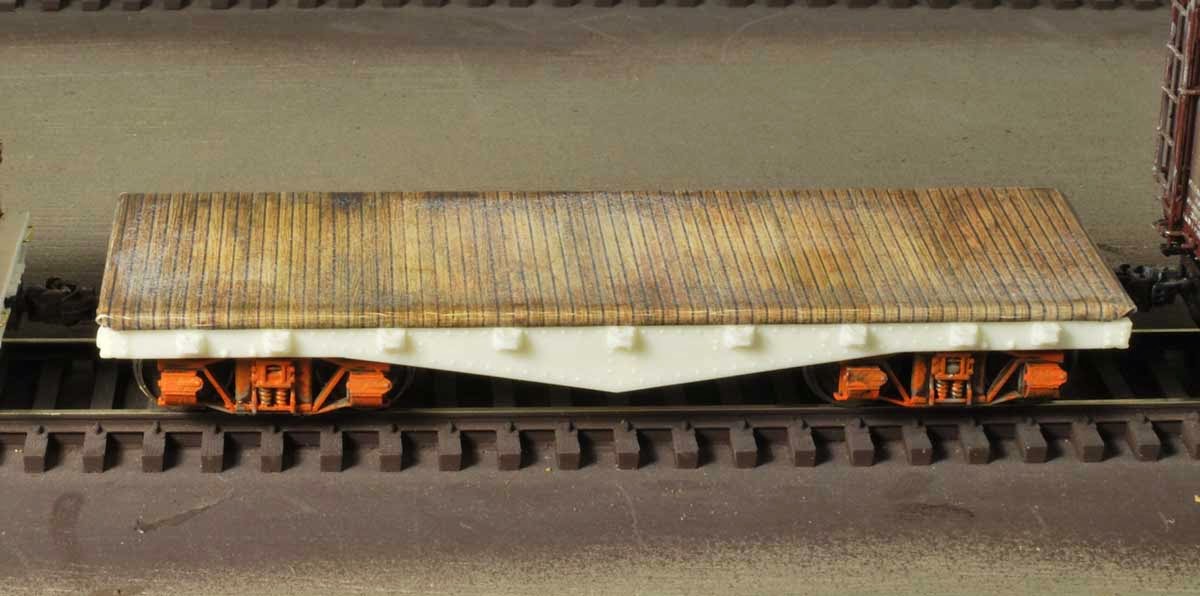
Beginning with the wheels and working up from there, the trucks will need to be changed out. The Rutland PS-1's came with solid bearing, ASF A3 Ride Control trucks. These can be replicated with Kato part 31-601 which have excellent detail including brake beams. That said, the wheel sets were replaced with Intermountain Code-88 semi-scale wheel sets. In the interval that has passed since the parts were purchased for this project, Tahoe Model Works has released their own version of the ASF A3 trucks. They can be purchased with Intermountain semi-scale wheel sets, part number TMW-110/210. The detail level of these trucks is just as good as the Kato trucks and may be more readily available.
Continuing on to the brake rigging, the plastic pieces are easily broken when removing parts from the sprues. Where the lines could not be glued into place, new lines were bent from 0.015 brass wire. The angle cock, glad hand, and air line for each end of the car was replaced with Cal-Scale parts. The coupler boxes were drilled and tapped for 2-56 screws and Kadee #158 Whisker Couplers were installed in them. The trip pins were removed. 
Moving on to the car sides, the doors and ladders were installed as per instructions. End grab irons were replaced with wire pieces formed from phosphor bronze wire from Tichy Train Group. 
B-End details include etched
brake wheel platform, and brake wheel.
 
On the B-end of the car, the brake wheel was replaced. For cars 100-107, the Ajax brake wheel was used (Kadee Part number) while for cars 108-450, the Universal brake wheel was used (Kadee Part number). The brackets for the brake wheel platform were installed, but the plastic walkway material was not used. Detail Associates coupler lift bars were added using an eye bolt in the left corner and one attached to the coupler box. The lift bar is secured to the left corner of the car but only looped into the eye bolt on the coupler box. This makes access to the coupler box simpler should servicing be required.
Modifications to the A-end include
Kadee #158 couplers, grab irons,
and uncoupling levers.
The “Style-A” plastic stirrup steps under the side grab irons were replaced with bronze parts formed from A-Line. The stirrup under the ladder could be replaced with a “Style-B” brass part as well. 
Instead of using NMRA practices to weight the car, pennies were used. A penny weighs 1/10th of an ounce, therefore 15 to 20 pennies, centred along the middle of the floor inside the box car body, were glued in place. The doors were also attached at this time, followed by the roof. Elastic bands were used to hold the roof in place while the glue set.  
The Plano etched roof walk really makes this roof pop. The authors are members of the famed Yellow Roof Society so the roof walks were painted to match the roof.
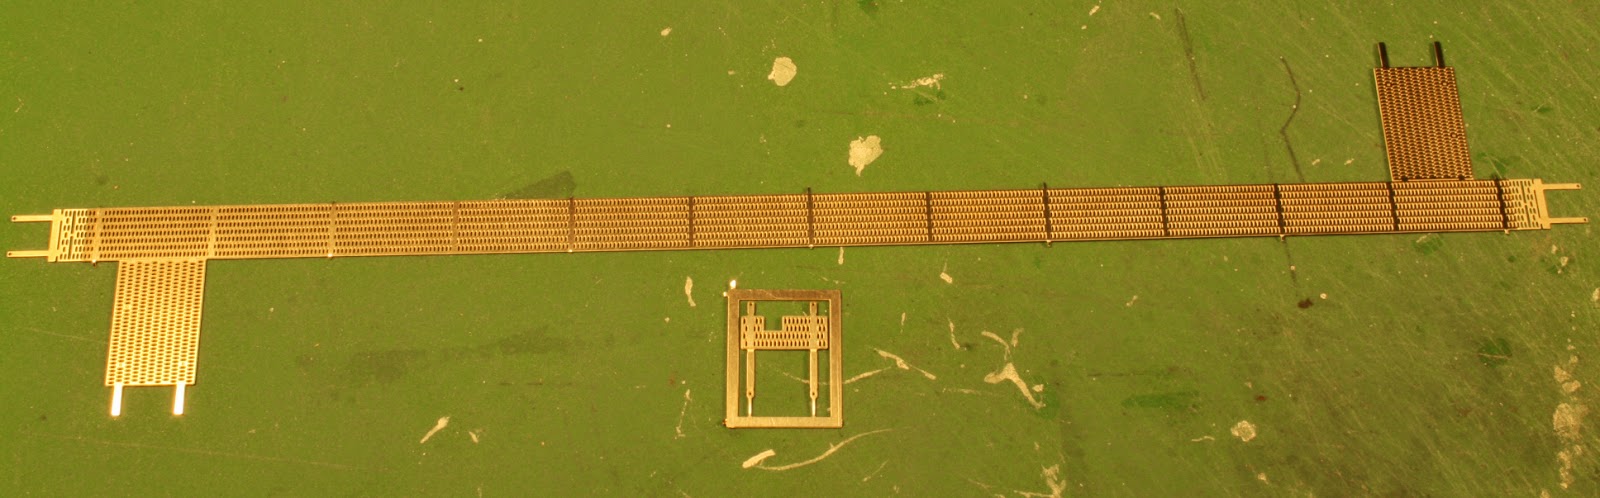
A Plano Model Products #191 40' Apex Walkway set was installed as per that company's instructions, the parts having been painted before installation. To attach dissimilar materials such as metal to plastic, a thin bead of Canopy Glue was applied with a Microbrush. The Canopy Glue works well in this application because it dries clear and is flexible enough to allow for the different expansion/contraction rates of the materials. This helps prevent the walkways from popping off the model. 
Other than touch-up and painting the roof walk, no other painting is required. The roof walk was painted yellow to match the yellow of the roof. Badger Modelflex primer grey was applied first, followed by C&NW Yellow from the same brand. The truck frames were painted with Oily Black paint and the wheels with Burnt Umber mixed with Black on the wheel faces and wheel backs. This treatment helps suggest oil, dirt and grime from the solid bearing trucks. 
Updating the lettering to bring the cars up to the same level as the later Steam Shack releases was accomplished with decals from Train Detail Works by Jerry Glow. Two decals sets were released by TDW that cover all lettering for trust plate lettering, markings, and numbering. The first set covers the 150-299 series, while the second set augments the first with numbering and details for the 100-149 and the 300-450 series. 
One detail that is often ignored is car re-weigh markings. Since 1959 is the year being modelled, it means that lower-numbered PS-1's would have been re-weighed and should be re-marked accordingly. Most of the re-weights were done at the car shops in Rutland, but it would not have been unusual for them to have been re-weighed at Bellows Falls, Alburgh or Malone. With re-weighs, try to refer to photos of the prototype. 
Once the decals were finished, a thin coat of Testors Glosscote was airbrushed  over the car to seal the decals and to also cover any decal film residual that might still show. Modellers will often choose to Dullcote directly over the decals following their application but this can actually make the decal film stand out. Once the Glosscote has dried, a light application of Dullcote was made. Next it was time to get dirty with car weathering.
Using a combination of artist oils, washes and some acrylic dry-brushing to weather the roof, sides and ends of the car, the first task was to airbrush the underside of the car with thin coats of Badger Modelflex Dust, Dirt and Grime paints. Working from darkest to lightest, weathering was concentrated near the trucks. The trucks themselves and the wheel sets were weathered using poster stencil cream available from Michaels. 
Completed PS-1s #194 and #118 show off their worn paint before going into service.
For cars in the lower number series, some rust spots were added to the sides of the car in appropriate places, such as where the door may have banged into the side of the car when being opened. On the roof, extra rust was applied to areas where water would pool and collect, such as near the seams and ribs.  Always work from photographs and use oil paints for the rust because they have a slow drying time and are easy to wipe off if the results are not what is desired. A thin layer of Dullcote will dry the oils very quickly. A final coat of Dullcote was added to seal the weathering is applied once everything is satisfactory. 
With that the car is ready to be released from the shops and head back to revenue service on the layout. 

About the Authors:

Phillip Blancher is Membership Chair of the Rutland Railroad Historical Society and the resident web-geek for the RRHS web site. The father of four kids is a communications and marketing consultant for the newspaper industry and as a web developer. Based in Morrisburg, Ontario, Blancher models the Rutland circa 1959 centred around Malone, New York.

Kevin Pytlak is the former owner of The Happy Hobo in Tampa, Florida and a confirmed freight car nut. Father of one, Pytlak works for an IT-company in Tampa and moonlights as a drummer in a Christian rock band. His interests are primarily Seaboard Coast Line between 1967 and 1975. 

Parts List:

Kato 31-601
Solid Bearing, ASF A3 Ride Control truck
or
Tahoe Model Works 110/210 - Solid Bearing, ASF A3 Ride Control truck

A-Line 
29000 – Style-A Stirrup Steps
29001 – Style-B Stirrup Steps

Cal-Scale
190-276 – Air Hoses & Bracket

Detail Associates
229-2222 – HO Eye Bolt 3 1/2' dia long   
229-6215 – Freight Car Coupler Lift Bar

Intermountain
IRC40052 – 33'' Semi-Scale Brass Insulated Wheel Sets

Kadee
58 – Semi-Scale Whisker Coupler
2040 – Ajax Brake Wheel (Black)
2043 – Universal Brake Wheel (Black)

Plano Model Products
191 – 40-foot Apex Walkway

Tichy
1106 – 0.012" Phosphor  Bronze Wire
1102 – 0.015" Phosphor Bronze Wire

Rutland PS-1 150-299 Decal Set
Rutland PS-1 Supplemental Decal Set


Thursday, August 14, 2014

Announcement: Resin Car Works - Consolidated Chemical Industries 7K Acid Tank Car


By Marty McGuirk

Resin Car Works is a new manufacturing enterprise. The company is new but steam era freight car modelers are very familiar with Resin Car Works owner Frank Hodina's work as a long time pattern maker responsible for many of Sunshine Models masters. Full disclosure - I've known about this enterprise for a while as Frank has been busy preparing the masters for RCW's first car. The car was announced at the St Louis RPM meet earlier in the month which means I am no longer bound by my vow of silence (although I've agreed to stay quiet about other RCW plans!) The flyer spells out RCW's mission "… to produce accurate HO scale resin car kits that are easy to build and that will actually be built and operated."
Frank is a long time friend of mine, and when he read my appeal for information for this blog he sent me the following note and the attached images: 


"Marty

I would love to be able to use your blog. I’ve been told I should have one now that RCW is almost up and running. I’m a good Roman though and will steal anything from anybody to use for my own profit and amusement.

Attached is a photo of the test/pilot model for the acid cars (see above). Hopefully the kit will be out at the end of October, first part of November. Pasting down the production patterns now. Need to build a few more and write the instructions. The only hang up is the photo etched parts and finding someone to do them. Don’t need much just tank car bands, ladders and parts for the larger platforms. - Frank"


Here are jpegs of the flyers announcing the first few road names for this car. When I have ordering information I'll post it here. 


Freight Car project, F&C CNR 8 Hatch Reefers

By Pierre Oliver

Funaro & Camerlengo have offered this resin kit for over 20 years now and it still stands the test of time. It surpasses the RTR version on so many levels. And I can get the car from F&C with three different ends and two door styles. And I get to build it!
In part inspired by the S scale 8 hatch reefers and as part of the ongoing stocking of Manifest #402, I've built four F&C HO 8 hatch reefers for my fleet.
Armed with knowledge gleaned from the car history included in the S scale kit I altered a number of details in the F&C kit.
The bracket grabs were upgraded to Kadee bracket grabs and the kit ladders were replaced with 8 rung ladders with integral stirrups offered by Des Plaines Hobbies.
For brake levers I used my etched levers and Tichy turnbuckles were cutoff and used to replicate clevis' on the brake rods. You will note that the reservoir is in an unusual position. This is correct for the early series of CN reefers and 40-foot boxcars. I also made all my own mounting brackets for the brake components from styrene. The braces for the heater were fabricated from strip brass.
The most involved detail change was for the hatch rests. You'll see that there's a pair of little angles attached to the carlines of the roof for each hatch. The kit does include cast resin parts for this, but they're a tad lumpy and there isn't enough of them. Each car requires 16, the kit had only 14. So I made my own.
To insure that I wasn't caught short I made 80 hatch rests. 80 pieces of 1x3 6" long and 80 pieces of 1x6 6" long. Glue them together in an L and attach to the roofs.
The things we do!
But they look good, so I don't regret the effort. The car body was painted with CN Grey #11 and the floor was painted with CN Red #11.
The cars are waiting for decals. I had purchased four sets of decals from Black Cat Publishing, but do you think I can find them? So I reordered which means the errant decals will surface any day now.
Postscript: I did indeed find the missing decals this morning, nine months after the fact. Which just means I'll have to order more reefers from F&C!