About The Steam Era Freightcars Blog

This blog discusses all aspects of North American freight cars of the steam era, from the dawn of railroading through 1960.
It is intended to support the efforts of model railroaders who wish to produce the most prototypically accurate freight cars possible.
Prototype modelers are encouraged to participate in this blog. Please consider sending photos of prototypes and your efforts to model them, reviews of kits, books and other products, “articles” about your modeling efforts – with or without photos. The nature of blogging means the material can be "real time," and in-process models can be shared. These are not only welcomed, but appreciated as we all love to see a model develop over time.
Also welcome is information about upcoming prototype meets, shows, and other events.
Information submitted for this blog is considered gratis. Also, all submissions must include your name and contact email.
For more information or to submit information email steamfreightcar@gmail.com.

Sunday, January 20, 2013

Review: Westerfield NCandStL Fowler Boxcar


By Charlie Duckworth
Photo by the author

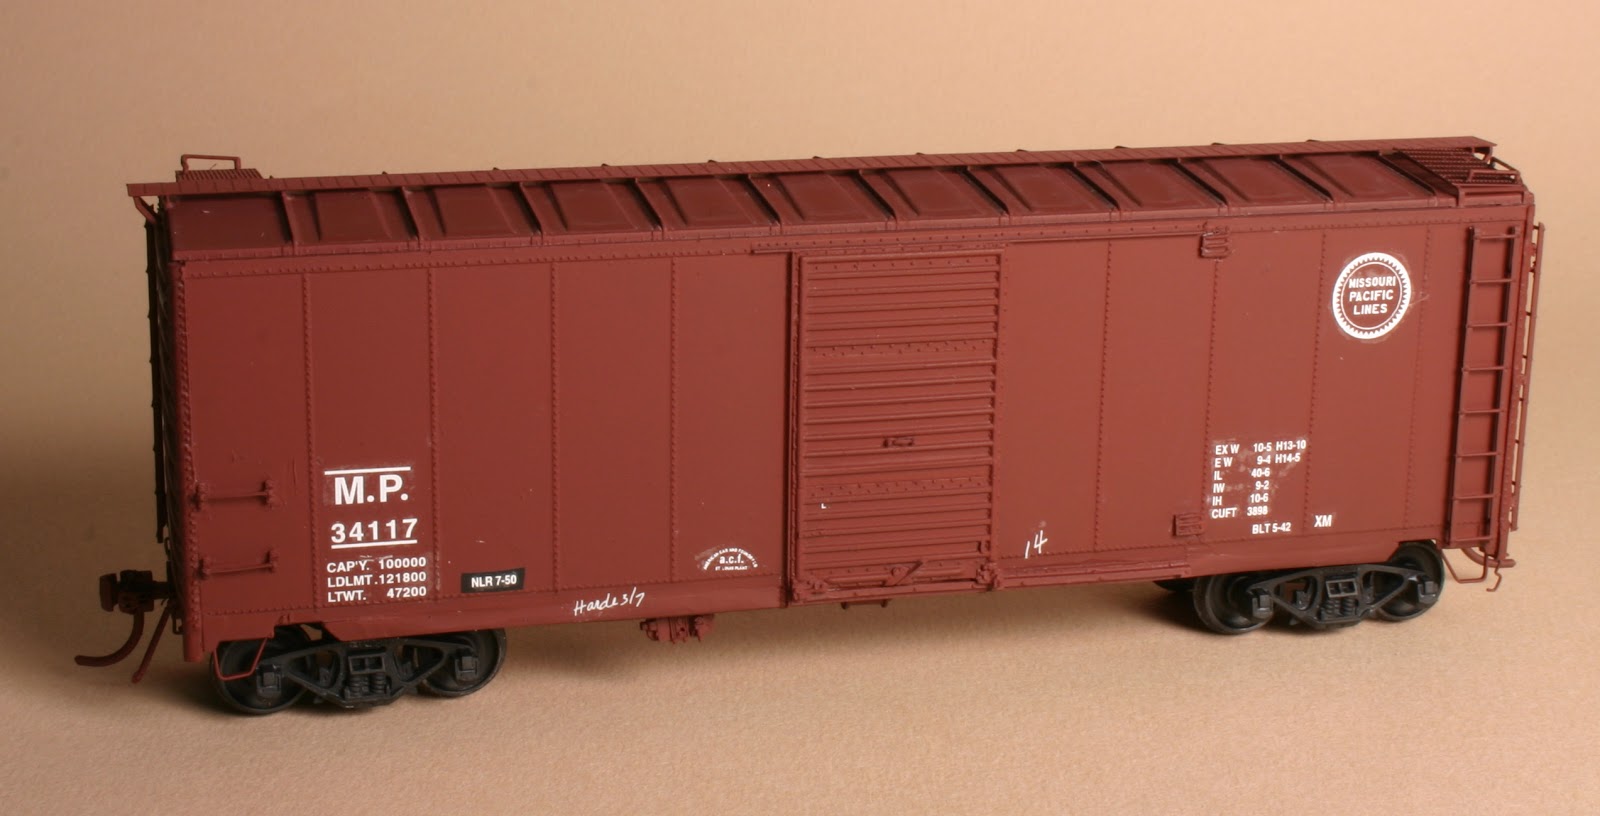
Westerfield Models HO scale 4355-2 Two-Brace Fowler Boxcar Modern NC&StL
Decals
I used a prototype photo I had to judge the accuracy of the decals in this kit.  The decals were a little confusing in the area of the initials used on the sides.  The decal sheet provides for two different sizes of letters but the smaller lettering for the side did not have the letters ‘StL’ and the ‘&’ sign included on the decal sheet.  I ended up using the larger letters and removed the period from each of the letters.  They appear to be a little larger that the letters in the prototype photo but in contrast the smaller lettering appears to be smaller in height when looking at the board width on the prototype.  The decals were thin but I still had to use liberal amounts of Solvaset and make several scoring cuts to get them to lay flat in the vertical seams.
Instructions
Westerfield's instructions are very detailed and give you step by step instructions for building this car with nice photos.  I do wish Westerfield would recommend a paint match for these cars vs using the generic 'Boxcar Red' in their instructions.  I was told by Justin May these cars were painted a ‘Oxblood Maroon’ by the railroad.  Looked on the web for an Oxblood Maroon color and ended up mixing my own using Floquil Rail Brown and Special Oxide Red. Justin recommends a mix of Floquil Zinc Chromate Primer and Oxide Red, tinted to suit your degree of weathering. He provided the following links as to NC&StL's color.

http://www.rr-fallenflags.org/misc-n/ncst22157ajs.jpg
http://www.railcarphotos.com/PhotoDetails.php?PhotoID=63835

So your painting mixes are up to you.
Castings
This is a flat kit meaning the sides, ends, roof and unferframe are all separate castings.  There were no surface air bubbles and all the parts were cleanly cast with very thin flash to clean up.  Be careful handling the side and ends as the thin details along the top of the side and bottom of the ends can be easily broken off.  The was some minor build-up of resin around the lower part of two of the ‘Z’ braces but it wasn’t enough to be concerned with and disappears after painting and weathering.   The steps are made from commerical plastic
that will hold up to handling during operations.
Ease of assembly
I use four Legos in the interior structure when building a flat kit. The Lego is first glued to the sides with the small end facing the end of the car.  This gives you a pretty large surface to glue the ends on to as well as creating a perfect 90 surface as you build up the car
body box.   I also cut a piece of Evergreen plain .030 styrene to make an interior roof.  This allows you to glue the interior of the sides to get a perfectly straight sides.  I also use a piece of HO 8” x 8’, gluing it from the top of the two ends to give me more support to glue the roof to.  I found this model to be very easy to build - even with the number of holes that had to be drilled for the wire hand grabs and the underframe is simple to build.

Available direct from Westerfield Models:
https://id18538.securedata.net/westerfieldmodels.com/merchantmanager/index.php?cPath=39&page=3

Population:
January 1940 - 1,441
October 1953 - 59

Saturday, January 19, 2013

Tips & Tricks: Future To the Rescue?


By Marty McGuirk
Building rolling stock is perhaps my favorite part of the hobby. Since I profess to like it so much, you shouldn’t be surprised that I think building, painting and decaling a single-color boxcar should not be that much of a challenge. Then I ran into this project – a Missouri Pacific 10-6” 40-foot boxcar.
The origin is one of the Sunshine Models “doorprizes” from the Naperville Railroad Prototype Modelers shows Martin and Patricia Lofton sponsored for years.  
These varied by year - some are loads, and one year it was a complete CB&Q flat car, but most have been an assortment of resin details (doors, ends, etc . . .) to convert an injection molded plastic car to some specific prototype. I have ten or so of these and they all produce some pretty neat and unusual transition era freight cars.
The building process went remarkably well.  The door prize parts were installed on an undecorated InterMountain 10’-6” AAR boxcar, and I even replaced most of the Intermountain details (ladders, brake rigging and the like) with after-market parts.  I rearranged the brake components to match the prototype (which differed from the stock Intermountain arrangement and fashioned the underbody piping from appropriate sized brass wire.


I photographed the finished, but unpainted car and then sprayed the model with Polly Scale acrylic paint.  Then, like usual, I gave the model a clear gloss coat (Polly Scale Clear Gloss) and applied the decals. I finished decaling and applied the final clear flat overcoat. Since I didn’t have a spray booth, and didn't have any Polly Scale Flat Clear, I used Testor’s Acryl Clear Flat – which is a brand more commonly used for military models and the only one available from the closest hobby shop. 
It was the first time I tried using this stuff (lesson learned, experiment on old Athearn “blue box,” not a model you care about!).  Whatever the cause, when the stuff dried it left a visible, white, streaky haze. Perhaps I got an old bottle of the stuff.
What a mess.


I studied the model, and figured the basic car was worth the effort to strip and refinish it.  But recently I’d been reading in FineScale Modeler about using Future Floor (now marketed as “Pledge with Future Shine) as a decal clear coating. I have some of the stuff, so I figured I had nothing to loose.  If it worked, great, if not, it was just one more layer to strip. I lightly brushed a coat of Future on the sides and left it to dry overnight.  
This next morning the silvering had all but disappeared. Better yet, that cloudy streaking was Gone!! I think the remaining issues with the finish can be hidden with some careful weathering. Once the model is weathered, I'll post a follow up. In the meantime, I think I'll use Future to do the decals on my next rolling stock model. I still haven’t figured out acrylic clear flats. Believe I stick with good ole’ Dullcote for now!

HO Scale Steam Era Freight Car Trucks

By Marty McGuirk
Well known freight car modeler and historian Richard Hendrickson has recently updated his summary of HO scale steam era freight car trucks, available online HERE. If you ever needed to know how a "Bettendorf T Section" differs from an "ARA Cast Steel with Spring Plank" - well, here's your chance to find out, and determine which is the correct truck for your next project.

Friday, January 18, 2013

Review: Westerfield Models Great Northern 9000-series

By Charlie Duckworth
Photo by the author

Westerfield Models HO scale Great Northern kit No.10453 9000 
series with 1948 Lettering.


Decals:
I used Larry Kline and Ted Culotta's The Postwar Freight Car Fleet to judge the accuracy of the decals on this kit (page 19).  They appear to be very accurate as to the lettering designed used by the Great Northern for these cars.  The decals were thin but I still had to use liberal amounts of Solvaset and make several scoring cuts to get them to lay flat in the vertical seams.
Instructions:
Westerfield's instructions are very detailed and give you step by step instructions for building this car with nice photos.  I do wish Westerfield would recommend a paint match for these cars vs using the generic 'Boxcar Red' in their instructions.  My understanding is these cars were painted a Mineral Red.
Castings:
This is a one piece body and on my kit the sides warped inward; to fix this I cut six .040 Evergreen styrene shapes and glued them in the inside of the carbody to help push the sides out.  While this warp-age is noticeable during construction after painting and weathering it isn't a distraction.  There were no surface air bubbles and all the parts were cleanly cast.  The nut and bolt castings on the ends are very well done.  On the down side, I don't like the resin steps as they break easily once the car is finished.
Ease of assembly:
The one piece body will be welcomed by many builders but due to the nature of the resin the sides or roof can be warped.  I found this car to be very easy to build - even with the number of holes that had to be drilled for the wire hand grabs.  the underframe takes time due to the numerous truss rods but this is what makes the car unique on your layout. If I were to recommend a first Westerfield kit to a modeler wanting to build their first resin kit this would be one I would pick. The 1948 paint scheme does not require any masking. I used Floquil paint and glaze to paint the model.

Available direct from Westerfield Models:
https://id18538.securedata.net/westerfieldmodels.com/merchantmanager/index.php?cPath=83

Population:
January 1940 - 979 cars
April 1952 - 783 cars
January 1955 - 290 cars