About The Steam Era Freightcars Blog

This blog discusses all aspects of North American freight cars of the steam era, from the dawn of railroading through 1960.
It is intended to support the efforts of model railroaders who wish to produce the most prototypically accurate freight cars possible.
Prototype modelers are encouraged to participate in this blog. Please consider sending photos of prototypes and your efforts to model them, reviews of kits, books and other products, “articles” about your modeling efforts – with or without photos. The nature of blogging means the material can be "real time," and in-process models can be shared. These are not only welcomed, but appreciated as we all love to see a model develop over time.
Also welcome is information about upcoming prototype meets, shows, and other events.
Information submitted for this blog is considered gratis. Also, all submissions must include your name and contact email.
For more information or to submit information email steamfreightcar@gmail.com.

Showing posts with label Tips and Tricks. Show all posts

Monday, August 6, 2018

Resin Freight Car Kit Assembly tips.

If your summer has been as wet as ours has been perhaps you were Googling "ark building" when you stumbled across this blog. 
In the interest of providing something useful on this blog I'll go ahead and offer a few tidbits on preparing resin kits. That's a perfect task for the summer modeling season. 
These are bits and pieces of a planned eBook on building and detailing rolling stock. While I still hope to finish that book - someday - in the meantime here's a couple of things from the cutting room floor.


Cleaning up the parts 
No matter the manufacturer, I start by cleaning the parts before assembly, and then follow up with a pre-painting touch up cleaning. 
Different manufacturers use different mold releases - some of them are really hard to clean off completely - and you won't realize it's still there until you try to paint the model and the paint either beads up or comes off in sheets. Sylvan mold release seems to be the toughest. 
I've tried warm soapy water, Goo Gone, Sylvan resin prep (which I'm pretty sure is some form of Goo gone), but one thing I've found always works pretty well is Shout. After removing the resin sheets from the tissue paper wrapping I gave each of the parts a shot of "Shout" (yes, the laundry stain pre-treat stuff) and scrub them gently with a toothbrush  before rinsing them under warm water. Then I put the parts aside to dry.

A few tools
I don't use a lot of fancy tools to build these kits, mostly a razor blade, an X-acto, some sanding sticks/files, pliers (to form wire), tweezers, a small machinists square, and starting in the last few years, an Opti-visor....
For drilling holes for grabs and brake components and the like, I prefer my drill press - but an old fashioned (but perfectly serviceable) pin vise works just as well.  Two tools that I find are really useful are shown in the photo to the right: 
The NWSL True-Sander 
Coffman right corner clamps

Removing flash
The most tedious part of building a resin freight car is cleaning up the parts.
But time and care spent on this task definitely shows on the finished model. Despite what the instructions say, I don't clean off all the parts before I start constructing the model. For one thing, I'd run out of enthusiasm before getting started, and for another I'd likely lose half the parts before getting everything together!

If there's a trick to removing the flash it's to be careful to not accidentally remove any detail that should be there. On flat kits it's quite common to find the sides or ends have some detail that needs to be preserved. A perfect example are the rivets on the side of the ends of this car - you might be tempted to sand the edge flat on your NWSL Tru-Sander - but you'd be removing the rivets and other details. The trick is to remove the flash without destroying the detail in the process.  For this, I use a razor blade held at a steep angle to scrape away the resin flash. I've found it's sometimes better to use a slightly dull razor blade for this scraping technique. A sharp, fresh blade can sometimes slice right into the resin whereas a dull blade will meet with just enough resistance that you can avoid digging into the part. 
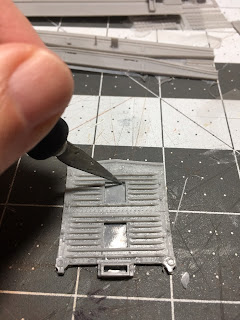
To remove flash from openings, such as the end of this ventilated boxcar, I use a hobby knife and trim the resin flash to the edges, then use sanding sticks and/or files to true up the openings. 


Friday, September 26, 2014

Deck techniques on a flat car build

By: Eric Hansmann
Photos by the author


A recent HO scale kit build of a pair of Pennsylvania Railroad F22 class heavy duty flat cars made me rethink the deck castings and presentation. I had planned to cram lead shot and strips into the nooks and crannies of the underframe, as had been done on a few older resin freight car kits with deep side sills. I did not like that process so my mind wandered. How can weight be added using a simplified effort?
Several years ago, I applied a sheet lead weight to a USRA composite gondola model and covered the lead using a paper print out. The original gondola bottom part was scanned and the printed and trimmed image was laminated to the lead sheet in place of the floor. The combination gave the model a great operating weight and minimized the floor thickness. I decided to try this on the F22 flat cars.


These are nice Funaro & Camerlengo models, but they are pretty light. With trucks and couplers, the basic frame weighs 0.5 ounces without the resin deck casting. A lead sheet trimmed to the deck dimensions weighs 1.3 ounces. Sadly, I only have a cheap, hardly calibrated postal scale. Scientists would laugh at this so these are rough figures. The NMRA recommended weight for this thirty scale foot model is 3.0 ounces. I aim for 75% of the NMRA recommendation. The combined lead sheet and model falls about 0.5 ounces below my 2.25 ounce target. A load may boost the weight in the long term, or some extra can be fit into the underframe cavities. But the lead sheet can minimize the work.
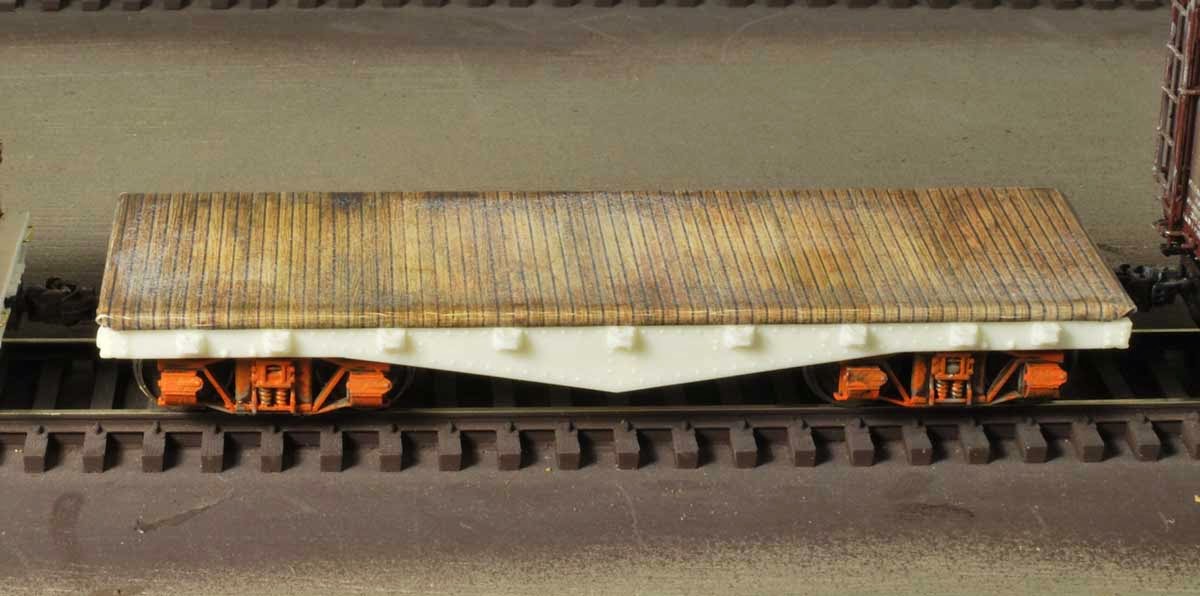
Encouraged by the overall weight addition, I moved forward and prepared a deck casting. A rattle can of light tan color was sprayed onto the deck. A wash of oil-based burnt umber came next then dirt and soot were applied using Pan Pastels and Bragdon powders. The deck was scanned. The lead sheet is 0.047 inches thick, about four HO scale inches. A laminated image will need to wrap around the sides and ends. Using Photoshop, portions of the deck image were copied and pasted to create an image that will overlap the thickness of the lead sheet. This was printed onto glossy photo paper, trimmed, and carefully laminated to the lead using rubber cement. 
I shared a progress image with a circle of modeling friends and requested critical responses. Overall, they liked the basic idea but there were a few issues.
The edges were not crisp
It looked thick
The corners needed more attention
The deck color looked too new
I agreed with all of their points so work began anew, which was easy since I was building two of the same kit. The second deck was sprayed with primer grey. An oil-based black wash was applied then Pan Pastels and Bragdon powders were used to add grit. Here are the process images for those three stages of work.

Step 1: Deck Wash
Step 2: Deck Dirt
Step 3: Deck Soot

The second deck was scanned and manipulated similar to the first attempt. Grey lines were added to mark the boundary of the deck edge and to emphasize that edge. This also helps when folding the image over the lead sheet. 

As there were two decks they should not be identical. The first deck scan was used so portions of that deck could be copied and pasted onto a copy of the second deck image. These lighter toned portions of the first deck made it seem like replacement boards had been added. A heavily weathered portion of the second deck image was replaced with a copy of another part of the same deck and rotated. After some nudging of digital image parts, the two decks were ready to print.

Plain paper was used for the printout and this was much thinner than the glossy photo stock. Each image was carefully trimmed and laminated to the sheet lead weights. Care must be taken to avoid overlapping the paper on the back of the lead. This minimizes the thickness and makes a smooth surface for the final installation.

Once the print out is laminated to the lead sheet, it needs to be sealed with clear flat. This needs to be done to minimize liquid damage to the print out. The decks are done but they await installation on the car body until after the painting, lettering, and weathering phases are complete. At that point, the hand brake hardware can be installed as well as any hardware for load transportation. 
By using a printed laminate, a modeler could make a few different decks for the same flat car body. Portions of different deck images can be substituted onto other deck images to vary the appearance through different print outs. A pair of brass pins mounted in the lead sheet could be keyed to position the deck, enabling an easy change of loads that are secured directly to the deck. I haven't gone this far yet, but it has crossed my mind. 


Tuesday, August 19, 2014

Tips and Tricks: Removing Small parts from Resin sheet


By Marty McGuirk

One technique you might find useful on a resin kit is the following method to remove all those tiny resin details from the resin "flash" sheet. Instead of spending hours with a hobby knife and needle files anxiously separating the part from the resin try sanding that flash away.
In this case I started removing the stake pockets (26 of them) by cutting about 3 or 4 of them from the main sheet. Then I gently rubbed the piece on a sanding stick (which I happened to have handy, for larger parts - like a stock car side - use a piece of sandpaper on a flat surface). Moving the part in a gentle circular motion will make the resin paper thin. Eventually you'll find the pieces will pop right out!

Monday, August 18, 2014

Tips and Tricks: Weighting a flat car


By Marty McGuirk

I build most of my freight cars to run on the layout, not to enter a contest. This means I often don't bother adding the those parts and underbody components that (1) interfere with operation or (2) can't be seen in profile with the car sitting on the track. I might ignore Rule 2, but I never break, or bend Rule 1.
Adding weight to house cars is pretty straightforward but adding enough weight to a flat car or gondola can be a challenge. You could weight a flat car by adding a heavy load, but it’s nice to have an empty car that tracks reliably.
I used A-Line "lead buckshot" style weights for this. The photo shows about half the weights in place. I tried CA at first, but that was difficult to work with. I found a thick coat of Pacer Formula 560 Canopy Glue is a great way of adhering dissimilar parts (like etched metal to plastic) so I decided to try it. My tests showed the buckshot stayed in place so I filled the "voids" between the center sill and cross stringers above the trucks with Canopy Glue and dropped the buckshot into the glue. I also filled the space between the two center sills with Canopy Glue and dropped in more lead shot. 

Thursday, August 14, 2014

Tips and Tricks, Working with Yarmouth Model Works etched ladders

By Pierre Oliver

 
The question keeps coming up at RPM meets, so I will share my method of working with the etched ladder stiles I offer through Yarmouth Model Works.
First step is to run a #80 drill through the etched holes to insure adequate clearance for the grabs that will follow. Sometimes the etching process leaves the holes a tad undersized.
With that done clip the stiles free of the fret. Xuron makes an excellent set of shears for this task.
Next fold the stiles into long angles. I recommend the 4" Mk IV RTH Hold & Fold tool from The Small Shop. I blogged about this tool here, http://elgincarshops.blogspot.ca/2014/03/a-better-mouse-trap.html


With the stiles done, prepare the rungs. I use Tichy pre-formed grabs, but you can use whatever you like or form your own from finer wire or a different rung width. Clip the grab legs very short. You only need enough to just pass through the stile. You'll also want to prepare a styrene spacer. Cut a scrap of 0.020" styrene 0.185" wide and about 3" long


 Now for the fiddly bit. Rest a stile on each side of the spacer. Note that there are left and right stiles. Grab a rung with your tweezers and wiggle it into the holes. A little dab of glue and move on.


Slide the assembly along the spacer and add another rung and secure. Use your eye to keep everything square. The glue won't fully cure immediately, so you have some fiddling time.
Repeat as required.
 

Ta Da!
With practice you can do this fairly quickly. I can do a full set of ladders for a car in about 20 minutes on a good day.


Now about adhesive. Standard CA does not bond well on metal to metal joints. I was told about this stuff by my friend Peter Aue, who is also responsible for a lot of the etching artwork I use. This Loctite product is specifically meant for metal to metal joins. It is pricy, but it is really good stuff. Store it in the fridge and you should be good for quite some time.


With the ladders assembled, create some standoffs from 3" lengths of 2"x3" styrene and glue to the inside of the angles. The exact location will vary by car. You may also want to add standoffs to the outside stile of the end ladders as well, again depending on the car.


Secure your ladders to the car, and stand back and admire. The result is well worth the effort.
We are working on another ladder spacing. 15" rung centres will available soon.

Saturday, January 19, 2013

Tips & Tricks: Future To the Rescue?


By Marty McGuirk
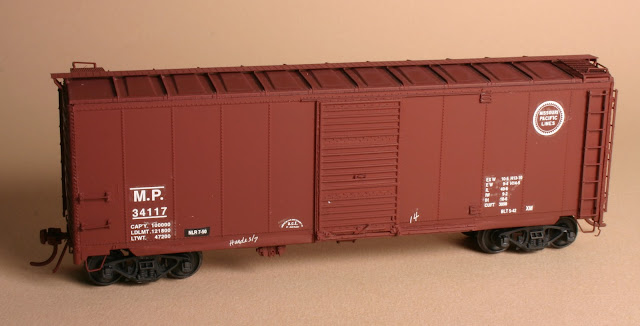
Building rolling stock is perhaps my favorite part of the hobby. Since I profess to like it so much, you shouldn’t be surprised that I think building, painting and decaling a single-color boxcar should not be that much of a challenge. Then I ran into this project – a Missouri Pacific 10-6” 40-foot boxcar.
The origin is one of the Sunshine Models “doorprizes” from the Naperville Railroad Prototype Modelers shows Martin and Patricia Lofton sponsored for years.  
These varied by year - some are loads, and one year it was a complete CB&Q flat car, but most have been an assortment of resin details (doors, ends, etc . . .) to convert an injection molded plastic car to some specific prototype. I have ten or so of these and they all produce some pretty neat and unusual transition era freight cars.
The building process went remarkably well.  The door prize parts were installed on an undecorated InterMountain 10’-6” AAR boxcar, and I even replaced most of the Intermountain details (ladders, brake rigging and the like) with after-market parts.  I rearranged the brake components to match the prototype (which differed from the stock Intermountain arrangement and fashioned the underbody piping from appropriate sized brass wire.


I photographed the finished, but unpainted car and then sprayed the model with Polly Scale acrylic paint.  Then, like usual, I gave the model a clear gloss coat (Polly Scale Clear Gloss) and applied the decals. I finished decaling and applied the final clear flat overcoat. Since I didn’t have a spray booth, and didn't have any Polly Scale Flat Clear, I used Testor’s Acryl Clear Flat – which is a brand more commonly used for military models and the only one available from the closest hobby shop. 
It was the first time I tried using this stuff (lesson learned, experiment on old Athearn “blue box,” not a model you care about!).  Whatever the cause, when the stuff dried it left a visible, white, streaky haze. Perhaps I got an old bottle of the stuff.
What a mess.


I studied the model, and figured the basic car was worth the effort to strip and refinish it.  But recently I’d been reading in FineScale Modeler about using Future Floor (now marketed as “Pledge with Future Shine) as a decal clear coating. I have some of the stuff, so I figured I had nothing to loose.  If it worked, great, if not, it was just one more layer to strip. I lightly brushed a coat of Future on the sides and left it to dry overnight.  
This next morning the silvering had all but disappeared. Better yet, that cloudy streaking was Gone!! I think the remaining issues with the finish can be hidden with some careful weathering. Once the model is weathered, I'll post a follow up. In the meantime, I think I'll use Future to do the decals on my next rolling stock model. I still haven’t figured out acrylic clear flats. Believe I stick with good ole’ Dullcote for now!